Dictionary Carnation Tutorial November 11, 2011
Hello again! It is Sesil here to show you a quick tutorial on how I create a dictionary Carnation.
My favorite Therm O Web Adhesive would have to be hands down the ZOTS! They have the exact amount of grip that I am always looking for in my projects. Today I wanted to share a project featuring JUMBO Zots.
______________________________________
 Supplies:
2 – sheets of dictionary paper
1 – scrap sheet of cardstock
1 – 2” scallop punch
1 – 1.5” Circle puch
1 – pencil
Instructions:
- Using the 1.5” circle puch, punch out 1 circle using a scrap sheet of cardstock. This will be the base of your flower.
- Add a Jumbo Zot to the center of the 1.5” circle.
- Using the 2” scallop circle punch, punch out 10 scallop circles.
- Using one scallop circle, place the eraser end of the pencil in the middle of the scallop circle and crumple up the circle around the end of the pencil eraser.
- Adhere the scallop to the center of the Jumbo Zot.
- Continue to place the crumpled scalloped circles on the Jumbo Zot until you fill the entire Zot .
- Now you have a completed Dictionary carnation.
I love dictionary paper and ZOTs. And now I have a fun carnation to add to my project. I hope you enjoyed today’s quick tutorial.

Hello again! It is Sesil here to show you a quick tutorial on how I create a dictionary Carnation.
My favorite Therm O Web Adhesive would have to be hands down the ZOTS! They have the exact amount of grip that I am always looking for in my projects. Today I wanted to share a project featuring JUMBO Zots.
______________________________________

Supplies:
2 – sheets of dictionary paper
1 – scrap sheet of cardstock
1 – 2” scallop punch
1 – 1.5” Circle puch
1 – pencil
Instructions:
- Using the 1.5” circle puch, punch out 1 circle using a scrap sheet of cardstock. This will be the base of your flower.
- Add a Jumbo Zot to the center of the 1.5” circle.
- Using the 2” scallop circle punch, punch out 10 scallop circles.
- Using one scallop circle, place the eraser end of the pencil in the middle of the scallop circle and crumple up the circle around the end of the pencil eraser.
- Adhere the scallop to the center of the Jumbo Zot.
- Continue to place the crumpled scalloped circles on the Jumbo Zot until you fill the entire Zot .
- Now you have a completed Dictionary carnation.
I love dictionary paper and ZOTs. And now I have a fun carnation to add to my project. I hope you enjoyed today’s quick tutorial.

TUESDAY, NOVEMBER 1, 2011
Getting ready for Christmas...Advent Calendar.
Hi everyone, it is Sesil here to guide you through today's inspiration.
I had a great opportunity to work with the Silhouette Advent Calendar. I had so much fun decorating this sturdy wooden calendar with Teresa Collins Designs - Christmas Home Collection. It was nice to be able to have everything at your fingertips.
The advent calendar is an empty wooden box and a download card to cut out the drawers or gift box to your liking using a Silhouette. I decided to go for the drawers because it gave me more space to embellish. I knew I wanted to use the numbers from the calendar page from the Christmas Home Collection. Here is what I was able to create with the Silhouette Advent Calendar and the Teresa Collins Designs Christmas Home Collection.
There are so many little details that you can add to the drawers. Adding your own papers would change the total feel of the calender. As you see I like to add a ton of bling and fun trims to most of the drawers. I had an amazing time working on this project. I really like the drawers because with three kids I could actually put things in the drawers for ALL THREE kids instead of having to purchase three separate advent calendars. SO THANK YOU Silhouette for making my life easier this holiday season.
Monday, October 31, 2011
I had a great opportunity to work with the Silhouette Advent Calendar. I had so much fun decorating this sturdy wooden calendar with Teresa Collins Designs - Christmas Home Collection. It was nice to be able to have everything at your fingertips.
The advent calendar is an empty wooden box and a download card to cut out the drawers or gift box to your liking using a Silhouette. I decided to go for the drawers because it gave me more space to embellish. I knew I wanted to use the numbers from the calendar page from the Christmas Home Collection. Here is what I was able to create with the Silhouette Advent Calendar and the Teresa Collins Designs Christmas Home Collection.
 |
| Full picture of the advent calendar. |
 |
| Top row of drawers. |
 |
| Middle area of the calendar. |
 |
| Bottom row of the calendar. |
Monday, October 31, 2011
Halloween layouts:
 |
| Products used: Teresa Collins Designs - Haunted Hallows Collection, Therm O Web: Sticky Tape Runner, 3D Zots, Super Tape, Bling/Tiny Zots, and Flowers from iamroses.com |
 |
| Products used: Teresa Collins Designs - Hunted Hallows Collection, Therm O Web: Sticky Tape Runner, Zots, and 3D Foam Squares |
Halloween Bookmark October 25, 2011
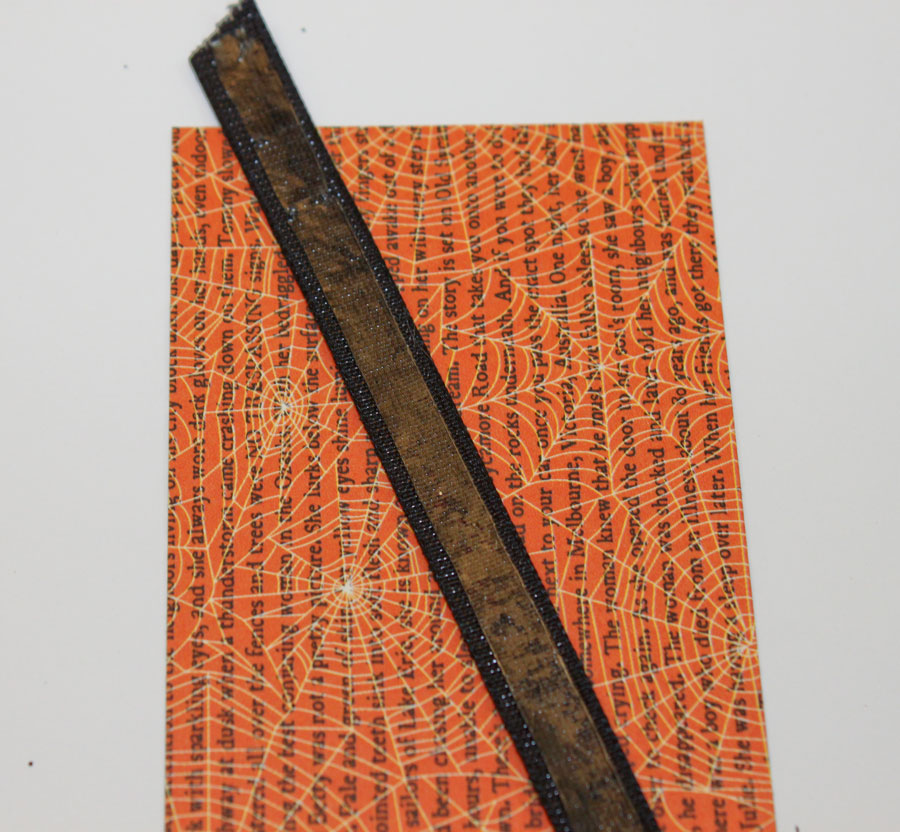
First, take the Sticky Lines and cut it to size of the ribbon. Then, take off one side of the liner and attach the Sticky Lines to the ribbon. This is one of my favorite applications on using Sticky Lines. I never can make my ribbon stick but now I have the perfect adhesive.
Now place the ribbon to the pattern paper.
Adhere down the pattern paper to the black cardstock using the Sticky Dot Runner.
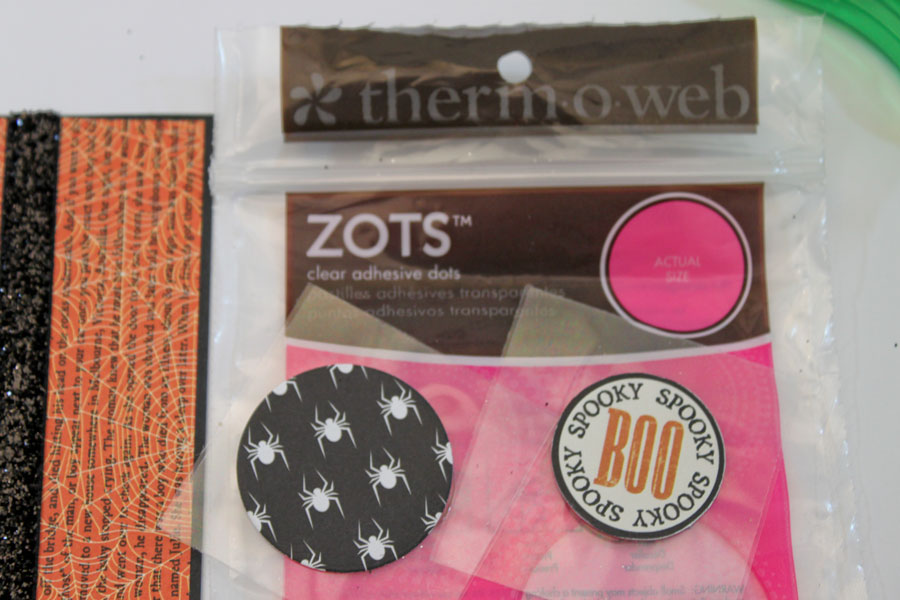
Using Jumbo Zots, attach the Jumbo Zots to the embellishments.
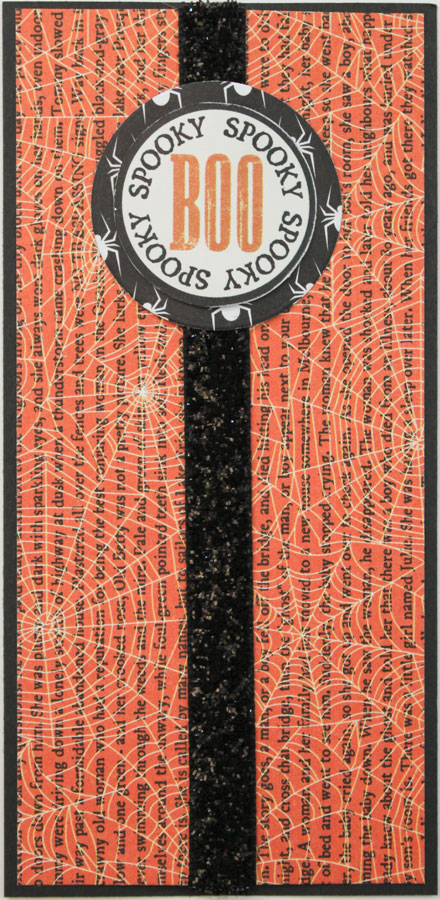
Then add the embellishments to the book mark.
Hope you enjoyed this quick tutorial on how to create a bookmark. Make sure to check back for more Halloween ideas. Have a safe and fun Halloween!
Sesil Cratin
Friday, October 21, 2011
My projects made it on Good Things Utah
Yesterday, Teresa Collins was on Good Things Utah and my projects made it on air!!!! Here are some pictures:
I made the Garland by punching out the pattern paper 6 times and grouped them together to create a "ball". Once I punched out all the "balls" I lined them up and just stitched down the middle with my sewing machine. Then I would pull the thread long between stitching the next group through the machine. Once I completed stitching the balls together I took two gems and used a Large Zots by Therm O Web to attach the gems together and onto the thread.
Here is the video of the segment from Good Things Utah.
ONE last thing: Check out Teresa's Blog HERE to enter to win a chance to win the cartridge that I used to make most of the projects.
Hope you enjoyed my creations. SO MUCH FUN!!!
I continued to spray the rest of the paper with the other colors to give my background more color. Simply attached all the other pieces to the layout and added the picture with the stamp runner.
Here is the layout completed.
 |
| Garland made with Haunted Hallows Collection Photo credit: Teresa Collins |
 |
| Crow Project made with Haunted Hallows Collection Photo Credit: Teresa Collins |
 | |
| Card and gift bag. Photo credit: Teresa Collins |
ONE last thing: Check out Teresa's Blog HERE to enter to win a chance to win the cartridge that I used to make most of the projects.
Hope you enjoyed my creations. SO MUCH FUN!!!
Wednesday, October 5, 2011
Just another Wednesday!
Did you see this on Teresa Collins Blog? If not go check out what I did with Carolina Breeze.HERE
October 05, 2011
Sesil Cratin did these beautiful cards-
“just for you card”
Designed by: Sesil Cratin (http://sesilcratin.blogspot.com)
Featuring: Teresa Collins Designs “Carolina Breeze” (http://teresacollins.typepad.com)
Supplies:
CB1308 Shelley
CB1306 Nellie
CB1311 Sticker Sheet
Other: Gray cardstock, White Cardstock, paper crimper, sentiment stamp, ink
Preparing your card components:
1. White Cardstock – Cut at 5.5 x 8.5, Then score paper on long side at 4.25” and fold card. Finished card should be 4.25” x 5.5”
2. Cut Shelley paper 5.25 x 4
3. Cut a strip of grey paper 6 x 1 and run it through the paper crimper.
4. Pull the Large Oval sticker off the sticker sheet and stick it to the gray cardstock and trim around the sticker to create a boarder around the sticker.
5. Cut out 4 flowers and 3 leaves out of the Nellie paper
6. Trim the yellow loop sticker to 5.25” and set aside.
Assembling your card:
1. Using your gray cardstock as a base attach Shelley paper in the center of the base cardstock.
2. Attach the yellow loop sticker to the crimped gray paper and attach to the card in the center.
3. Stamp a sentiment to the large oval sticker.
4 Layer and adhere the cut flowers on top of each other to create a layered/clustered effect to the left side of the large oval.
5. Attach the large oval to the center of the card using foam squares to give extra dimension to the card.
6. Place the card front to the white folded card to complete the card.
“damask card”
Designed by: Sesil Cratin (http://sesilcratin.blogspot.com)
Featuring: Teresa Collins Designs “Carolina Breeze” (http://teresacollins.typepad.com)
Supplies:
CB1305 Myrla
CB1311 Sticker Sheet
HH2617 Haunted Hallows Rhinestones
Other: Black Cardstock, white cardstock, yellow fabric tape, black ink
Preparing your card components:
1. White Cardstock – Cut at 5.5 x 8.5, Then score paper on long side at 4.25” and fold card. Finished card should be 4.25” x 5.5”
2. Cut black cardstock 5.25 x 4
3. Cut Myrla paper 2.25 x 4 and tear off the top bit of the paper.
4. Cut fabric tape at 2 x .5 (twice) and .75 x .25
Assembling your card:
1. Using your white cardstock as your base, fold the card and ink around the edges with the black ink.
2. Attach the black cardstock to the center of the card front.
3. Attach Myrla paper to the left side of the card.
4 Attach fabric tape (2x.5 size) to the bottom right of the Marla paper in a step like pattern.
5. Attach black damask sticker on top of the Nellie circle sticker. Then attach the layered stickers to the middle of the stacked fabric tape.
6. Attach the fabric tape (.75x.25) to the left top of the black cardstock.
7. Attach black rhinestones in an alternating patter to mimic the pattern of the Myrla paper on the fabric tape.
8. Attach black rhinestones randomly on the black centers of the Myrla paper.
“Family Card”
Designed by: Sesil Cratin (http://sesilcratin.blogspot.com)
Featuring: Teresa Collins Designs “Carolina Breeze” (http://teresacollins.typepad.com)
Supplies:
CB1303 Mckay
CB1311 Sticker Sheet
Other: Black cardstock, White Cardstock, Gray Cardstock, edge punch
Preparing your card components:
1. White Cardstock – Cut at 5.5 x 8.5, Then score paper on long side at 4.25” and fold card. Finished card should be 4.25” x 5.5”
2. Cut two strips of white cardstock at 5.5 x 1 and punch with any edge punch for a decorative edge.
3. Cut Black Cardstock 5.5x4.25 for the base of the card front
4. Cut two strips of black cardstock 5.5”x.25”
5. Cut Mckay paper 5.5 x 2
6. Cut gray paper 5.25x4
7. Place “family” sticker on black cardstock and trim around the sticker by hand to create a frame around the sticker.
Assembling your card:
1. Using your black cardstock as a base attach gray sheet on in the center of the base cardstock.
2. Attach the white edged paper on the Mckay paper on either side of the paper.
3. Attach the black strips to the seam of the white and pattern paper.
4 Attach assembled pieces to the gray cardstock
5. Attach the “Family” stickers with foam squares to the bottom left side of the card.
6. Place the card front to the white folded card to complete the card.
MONDAY, JUNE 20, 2011
Father's Day Card
I wanted to share the card I made for Robert for Fathers Day.So I pulled out my camera and supplies from my studio and this is what I created. It was so much fun taking the pictures of the kids and I was able to make a fun accordion fold card for the kids to give to their DAD. I used the Teresa Collins Design On the Edge paper collection to make the cover. Notice the bling on the card?!? I love using Zots by Therm O Web to add the rhinestones to the card. It was a quick and easy project that he absolutely loved.
Hope you had a great Fathers Day. Till next time! Happy Crafting.
Hope you had a great Fathers Day. Till next time! Happy Crafting.
WEDNESDAY, JUNE 22, 2011
"Drew"
Deisgned by: Sesil Cratin (sesilcratin.blogspot.com)
Featuring: Teresa Collins Designs On the Edge (teresacollinsdesigns.com)
Tombow Duel Tip Markers (tombowusa.com)
Deisgned by: Sesil Cratin (sesilcratin.blogspot.com)
Featuring: Teresa Collins Designs On the Edge (teresacollinsdesigns.com)
Tombow Duel Tip Markers (tombowusa.com)
I wanted to share my process of how I created this layout. I was faced with many obstacles but I was able to overcome them with confidence and I was pleasantly surprised with the result. Here is my layout.
My first challenge is that I didn't have the right color letters for the title of my page. So I decided to create my title buy using a resit technique using the Tombow Dual Tip Marker and Teresa Collins On The Edge Distressed Dot Paper. Here are letters I liked, but as you can see the letters are pink.
I decided to pull out this tool. I call it my spatter tool. I purchased this many years ago through an SU! Consultant.
I attached the Tombow Dual Tip Marker (brush side) through the holder and placed the tip of the marker at the end of the of the sprayer.
Next I used the Stamp Runner to temporarily adhere the wooden letters to the pattern paper.
Once the letters were in place I just sprayed the letters.
Then I removed the letters and traced around the letters to make the title POP off the page.
 | ||
| My pink letters for my layout. Problem #1 |
I decided to pull out this tool. I call it my spatter tool. I purchased this many years ago through an SU! Consultant.
 | |
| SU!'s Splatter tool |
I attached the Tombow Dual Tip Marker (brush side) through the holder and placed the tip of the marker at the end of the of the sprayer.
 |
| Marker at the tip of the splatter tool. |
Next I used the Stamp Runner to temporarily adhere the wooden letters to the pattern paper.
 |
| Using the Stamp Runner |
Once the letters were in place I just sprayed the letters.
 |
| spraying the wooden letters. |
Then I removed the letters and traced around the letters to make the title POP off the page.
I continued to spray the rest of the paper with the other colors to give my background more color. Simply attached all the other pieces to the layout and added the picture with the stamp runner.
Here is the layout completed.
TUESDAY, MAY 31, 2011
MONDAY, MAY 23, 2011
Check out some layouts that Sesil has created:
Caroline - Dodgers
|
“Dodgers”
Designed by: Sesil Cratin (http://sesilcratin.blogspot.com/)
Featuring: Teresa Collins Designs – Sports Edition II, Blingage (http://www.teresacollinsdesigns.com/)
Photo Credit: Krista Austin Photography, Chicago, IL (http://kristaaustinphotography.lifepics.com)
Supplies:
Teresa Collins Sports Edition II: Blue Numbers (Reverse) – 2 sheets
Teresa Collins Sports Edition II: Red Stars
Teresa Collins Sports Edition II: Shields (Reverse)
Teresa Collins Sports Edition II: Chipboard
Teresa Collins Sports Edition II: Tags
Teresa Collins Sports Edition II: Circle Tags
Teresa Collins Blingage: Ty’s Stars
Other supplies: Black Cardstock, Brown Ink, Therm-o-web Super Tape, Therm O Web 3d Foam Squares, Therm O Web Zots
Instructions:
Preparing your page components:
1. Cut and ink the following pieces from your papers:
· Blue Numbers (Reverse) 11” x 11” and enough to mat your photo
· Shields (reverse) 8x10
· Black Cardstock – border punch a 2x10 strip
· Red Stars – one column of red stars to 10 “
· From Tags paper – “respect all Fear none” & “No pain, no gain”
· From Circle Tags – “Sportsmanship”
Assembly:
1. Using the black cardstock as your base, adhere the blue numbers (reverse) paper to the cardstock.
2. Attach the Red Star paper strip to your black boarder strip and add it to the layout.
3. Attach the Shields paper to the layout.
4. Mat your photo with the blue numbers paper, and set aside.
5. Place the three chipboard and circle tag to the top right hand of the layout.
6. Attach “no Pain, no gain” to layout.
7. Attach your photo to the layout.
8. Attach “respect all Fear None” tag using Foam Squares.
9. Attach 3 Ty’s Stars to the bottom left side of the picture.
___________________________________
Here is another layout and a couple of detail pictures of Sesil's work.
SATURDAY, APRIL 9, 2011
SATURDAY, MARCH 5, 2011
Save the Date...and the process
I have been working on my brother's save the dates for his wedding. It is a process that I really enjoy.
I like the way they turned out. The little card on the bottom is a magnet. How cool is that?
Everyone laughs at my little process that I do when I do invitations and cards in bulk. It is a step for everything. At one point, I even had my neighbor help me tie the ribbon in a knot and add them to the magnets. However, I got them done and the save the dates are sent to my brother.
SATURDAY, MARCH 5, 2011
Teresa Collins Design Team - POSH CHA Winter Make and Take Mini Album
We are excited to be able to share with you the Make and Take that Teresa Collins Designs had for CHA-Winter 2011. Sesil created this mini album using the POSH collection.
Cover
|
Page 1
|
page 2
|
page 3
|
Back cover
|
We even have instructions: Mini Album Posh
“Posh Mini Album – CHA Winter Make and Take”
Designed by: Sesil Cratin (http://sesilcratin.blogspot.com/)
Featuring: Teresa Collins Designs – POSH, Blingage (http://www.teresacollinsdesigns.com/)
Photo credit: Angela Schlater Photography (http://www.angelaschlater.typepad.com/)
Supplies:
Teresa Collins Posh: Lace Stripes Paper
Teresa Collins Posh: Butterfly Script Paper
Teresa Collins Posh: Posh Flower Paper
Teresa Collins Posh: Damask Paper
Teresa Collins Posh: Pink Fishnet Paper
Teresa Collins Posh: Chipboard Album Covers
Teresa Collins Posh: Die-cuts
Teresa Collins Posh: Clear Stamps
Teresa Collins Blingage: Gentry’s Glitter
Other supplies: White CrepePaper, Black Crepe Paper, Therm-o-web Super Tape, Therm O Web 3d Foam Squares, Therm O Web Zots
Instructions:
Preparing your page components:
Assembly:
Cover:
Page 1:
Page 2:
Back side of page 2:
Page 3:
Back side of page 3:
Back Inside Cover:
Designed by: Sesil Cratin (http://sesilcratin.blogspot.com/)
Featuring: Teresa Collins Designs – POSH, Blingage (http://www.teresacollinsdesigns.com/)
Photo credit: Angela Schlater Photography (http://www.angelaschlater.typepad.com/)
Supplies:
Teresa Collins Posh: Lace Stripes Paper
Teresa Collins Posh: Butterfly Script Paper
Teresa Collins Posh: Posh Flower Paper
Teresa Collins Posh: Damask Paper
Teresa Collins Posh: Pink Fishnet Paper
Teresa Collins Posh: Chipboard Album Covers
Teresa Collins Posh: Die-cuts
Teresa Collins Posh: Clear Stamps
Teresa Collins Blingage: Gentry’s Glitter
Other supplies: White CrepePaper, Black Crepe Paper, Therm-o-web Super Tape, Therm O Web 3d Foam Squares, Therm O Web Zots
Instructions:
Preparing your page components:
- Cut the following pieces from your papers:
- Damask Paper(B side) 6”x 6”
- Butterfly Script Paper 5.75”x10”
- Damask Paper 5.75”x7.5”
- Lace Stripes Paper 10”x7.5”
- Butterfly Script Paper 5.75” x 7
- Pink Fishnet Paper 5.75” x 1”
- Cut out 11 flowers out of the Posh Flower Paper
- Cut three black butterflies out from the Butterfly Script Paper
- Cut out the white lace strip to 6” long
- Stamp two black butterflies, and one pink butterfly using the Clear Stamps
- Cut out stamped butterflies
- Punch out the following item on the die-cut paper:
- Pink Lace Border6”
- Butterfly Border 6”
- Polka Dot Border 6”
- Circle Damask
- Word “beautiful”
- Cameo Border 6”
- Black lace tag
- Pink long label
- Grey and Black Cameo
- “Remember” butterfly
- Add white Crepe Paper around the following:
- Circle Damask
- Bottom of the 6” Cameo Border
- Bottom of the white lace strip
- Add black crepe paper around the “Remember” die-cut
- Add dimension to butterfly with dry embossing styles.
- Add glitter to the centers of the butterfly.
Assembly:
Cover:
- Adhere the 6x6 Damask paper (B side) in the middle of the front cover.
- Add the pink borders to both the top and bottom of the Damask paper.
- Add sticky tape to the top and bottom of the edges and add Gentry’s glitter to the cover.
- Add three flowers to the bottom of the page.
- Add butterflies to the cover.
Page 1:
- Fold 2” from the bottom of the butterfly script paper.
- Add butterfly border to the top of the folded pocket.
- Add the polka dot border at the top of the picture.
- Add the word “beautiful” to the bottom right hand of the page,
- Add the circle damask embellishment to the left hand side on the edge of the pocket.
- Add butterflies to the page.
- Add glitter to one of the butterflies on the border.
Page 2:
- Add picture to the center of the Damak paper 5.75”x7.5”
- Add the B side of the Pink Fishnet paper to the top of the picture.
- Add the Cameo Border embellishment to the bottom of the picture.
- Layer three flowers together using 3D Foam Squares and add the flower cluster to the top left hand side of the picture.
Back side of page 2:
- Add the black lace tag to the middle of the page.
- Add the long pink label to the middle of the tag.
- Add three flowers to the center of the pink label using 3D Foam Squares
Page 3:
- Fold the 10x7.5 striped lace paper 2” from the right to create the flap.
- Put sticky strip down the right hand side of the page. Add glitter.
- Add white crepe paper to the inside of the flap
- Add Black Cameo to the flap of the page.
Back side of page 3:
- Add “remember” embellishment to the center of the page.
Back Inside Cover:
- Add butterfly script paper to the center of the inside back cover.
- Add picture.
- Add white lace embellishment to the bottom of the picture.
- Add flowers to the bottom left side of the picture.
SATURDAY, FEBRUARY 19, 2011
Team member Sesil says: I love creating quick and easy cards. I used my glitter ribbon by adding glitter to some Packing tape. I used glossy accents to the camo silhouette to give her more dimension, I also added Black stickeles around the cameo to bring out the bling in the black.
Items used to create her card: Posh: Butte
TUESDAY, JANUARY 4, 2011
Okay..so I won't leave you stranded without any pictures or a crafty project, So here is a picture of a mini album I made for my December swap partner Michelle on Life on the {Scrap}beach. I love these ladies! So here is a sample of Michelle's mini album.
 |
| Samples of the embellishments I put in the mini album. |
FRIDAY, NOVEMBER 26, 2010
A productive two days...
Have you ever had a productive weekend and got a ton of projects completed? Well this weekend I did just that. I signed up to do a Calendar Swap over at Life on the {Scrap}Beach. I had a great time designing it and I had my whole production system going. But I ran out of red ribbon, I was scared that I didn't have enough paper, I goofed up the sewing on some of the layouts...my list of mishaps kept going and going. But I was still happy with the outcome of the layout.
I used Making Memories Love Struck line for my layout. Thank goodness I had enough paper to make all 12 layouts. Phew!
I used Making Memories Love Struck line for my layout. Thank goodness I had enough paper to make all 12 layouts. Phew!
 | |||||||
| Close up of my project |
 |
| completed project...all 12 layouts ready to ship. |
THURSDAY, NOVEMBER 25, 2010
Happy Thanksgiving!!!
There are so many things that I am grateful for. I am grateful for my family, the move out to Utah and the opportunities that I have been given. Don't get me wrong, my life is not a fairy tale. There are many emotional roller coasters that pass through my life...but right now I am enjoying the ride.
I was wanting to share a project I did a few weeks back.As many of you know I love banners. Here is a banner I created using Teresa Collins Giving Thanks paper line, Blingage Alphabet Stamp set and Gentry's glitter. This was a quick and easy project.
I was wanting to share a project I did a few weeks back.As many of you know I love banners. Here is a banner I created using Teresa Collins Giving Thanks paper line, Blingage Alphabet Stamp set and Gentry's glitter. This was a quick and easy project.
 |
| Thanks Banner |
 |
| Close-up of one of the banner pennant. |
TUESDAY, NOVEMBER 16, 2010
My 12 Days of Christmas tags.
I just wanted to share a tag I made for a swap on Life on the {Scrap}beach. I was in charge of the cover for the tag swap. I missed the sign up and one of the ladies suggested that I do a cover tag. I agreed to be on both groups so I could participate. Oh wow. I am used to only having to make 12 but to have to do 24 WOW! Loved doing it ladies. So I thought I would share.
Supplies used:
Basic Grey pattern paper
"days of Christmas" I created on the computer and printed it out.
"12" cut from Songbird cartridge using my Cricut Expression
Rosette die - Tim Holtz Sizzix
Glitter ric-rack May Arts
Adhesive: Therm-o-web Super Tape, Foam Squares and Tape Runner.
Additional supplies:
Chipboard backing, tag, ribbon.
 | ||
| The pile of completed tags. |
 | |
| Detail picture of the tag. |
Supplies used:
Basic Grey pattern paper
"days of Christmas" I created on the computer and printed it out.
"12" cut from Songbird cartridge using my Cricut Expression
Rosette die - Tim Holtz Sizzix
Glitter ric-rack May Arts
Adhesive: Therm-o-web Super Tape, Foam Squares and Tape Runner.
Additional supplies:
Chipboard backing, tag, ribbon.
THURSDAY, NOVEMBER 4, 2010
Tattered Angels projects...
 |
 |








No comments:
Post a Comment